


This page is to show how I remove nib marks on my Gunpla kits, there are a lot of other techniques out there and I can’t say mine is the best.We all have our own preferences and this is my technique in removing and cleaning out nib marks. Its quite simple and its an adaptation of two techniques.
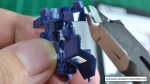
First thing to do is of course to cut the part out from the runners, what I do is I cut the part of the gate nearest to the runner as shown below. Why? Its to leave a large chunk of gate on the piece so that I will have enough plastic to cut away little by little. I will explain this more in a bit.
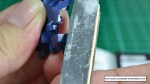
Before, I was cutting the gates nearest to the parts, but the problem is that most of the time, especially with dark colored parts like this one below, cutting nearest to the part leaves a white plastic strain/stress mark especially when your cutter is a bit dull already.


So the first technique/trick that I use is to cut away the large chunk of gate left on the piece little by little and slowly using a sharp cutter, with this technique, leaving white strain/stress marks on the piece is prevented. The trick is to leave a thin layer of gate on the piece and cut it last, logic behind it is that the less volume of the gate you cut, the less strain/stress is produced on the plastic, therefore prevents the white strain marks to appear after cutting.
Here is one example :


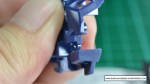
As you can see It is not 100% successful and it takes practice to get it done right. When this technique is unsuccessful, this is where the 2nd technique comes in. I’ll show it later.
Here’s another example :


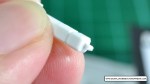
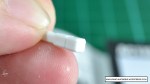
White colored parts are my most favorite pieces to cut since nib marks can hardly be seen.


Now for the 2nd technique(when the 1st one fails), I resort to sanding, which is more tedious and takes time especially when building an MG kit.
Tools I use for this task are my custom made sanding sticks :

Sand paper comes in big sheets and it is hard to use such big sheets in sanding your Gunpla parts, even if you cut away a small piece of sandpaper, it is still hard to use since it covers a large area.
Hobby shops sell dedicated sanding tools, they look like metal bars with abrasive ends. But they are too expensive to buy here in my country.. T_T
The solution is to make your own cheap sanding sticks made of popsicle sticks and strips of sandpaper. Its easy! Just cut two strips of sandpaper and glue it to the popsicle stick and viola! You have your own sanding sticks.
You might be wondering what those numbers on the popsicle sticks mean, well sandpaper comes in different grit sizes, grit meaning the particles that makes the paper abrasive! The larger the particle the more abrasive (and destructive) the sandpaper is! BUT DON’T GET CONFUSED! Grit designation number is actually inversely proportional to the abrasiveness and grit size of the sandpaper. What I mean to say is, the larger the GRIT DESIGNATION (the number printed on the back of the sandpaper) is, the smaller the grit particles are! Hence less abrasion, so don’t get confused!
Here is the Grit Size Table for reference :


What I use for my Gunpla kits are the grit sizes of P800, P1000, P1500 and P2000. P800 is used for leveling the nib mark with the plastic surface, be careful not to overuse this grit size though as it really chews away the plastic! If you’re unsure then use P1000 in leveling the nib mark instead, although it might take a little bit slower than using the P800.
Using P800 grit size :


Using the P800 will leave hard scratches and makes the surface of the plastic rough as if you sprayed it with Flat/Matte Topcoat. This is where the larger Grit designations (P1500, P2000) comes to the picture.
What the P1500 and P2000 does is to smooth the surface of the plastic as if you didn’t sand it in the first place and make an even smooth finish.This is due to the grit size being very tiny! Microscopic even! Imagine P2000 having a grit diameter of only 10.3 micro meters! This is quite useful if you want to keep your Gunpla kit shiny and if you plan to spray it with Topcoat Gloss.
Using P1500 :

Using P2000 :


Final stage would be the image above, as you can see, the nib mark is basically gone! Sometimes I amaze myself with this technique that when I accidentally put back the clean piece to the pile of pieces that needs nib mark cleaning and that I got it again for cleaning, I would say to myself : “What the? where are the nib marks!? Oh.. I cleaned this one earlier..” 😀
That’s it on how to (well I) remove nib marks! Hope this helps those who are just starting to build their Gunpla kits! Remember there are other techniques out there that might be faster or better, but I stick to this two techniques where I am comfortable with.
Gallery of the images :


We seem to employ the same methods in removing those damn nub marks. . . . Maybe I should make a blog post on how I build my gunpla. . . .
LikeLike
Haha well I’m just starting to build up my tutorials.. 🙂
LikeLike
Yup, that is the basic technique and I’m also comfortable using it. I still wonder when will Bandai release a kit that doesn’t leave a nub marks when we cut it off from the runner 😀
LikeLike
Yes I wonder, although they almost did it with the RG kits, most parts/gates in the runners of RG kits are really thin that they do not leave nib marks anymore. But still, not all parts. XD
LikeLike
I use both methods as well, first cut slowly then sand. =) But for dark-coloured stuff, sanding is a real pain since there will be the white spots.
And I see you’re doing a HG Unicorn? =3
LikeLike
wow you noticed that? haha! yes I am! =3
LikeLike
well Unicorn has a really distinctive backpack. =3
Heard that it’s rather brittle as well especially the beam sabers .=O
LikeLike
hmmm… so far it’s not 🙂
LikeLike
is it possible to use the same method for transparent part?
LikeLike
Yes I use this method for transparent parts, except the sanding part. 🙂
LikeLike
Orite mate.. tq. 🙂
LikeLike